8 yoga poses to combat back pain from sitting

Updated December 10, 2018.
Who knew that sitting could put so much stress on your body? But sure enough, a few hours behind a desk and most of us start to slouch, our shoulders roll forward, and the pressure and tension build on the neck and spine. Stop suffering. All you need is a mat and these eight simple yoga poses — designed for all fitness levels — to find relief.
Series 1: Strengthen your core for good posture.
Extended Table Top:
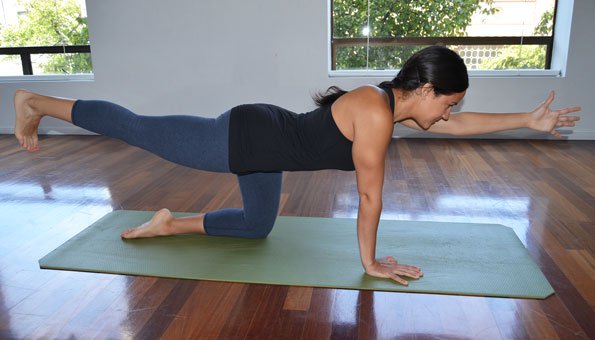
- Start in a table-top position with your hands and knees on the mat. Position your hands directly under your shoulders, your knees directly under your hips, keep your back flat, and your neck straight (face the ground).
- Inhale deeply and extend your right leg out behind you as you exhale. Keep your foot flexed and toes pointing down toward the mat. Keep your right hip in line with your left hip.
- Extend your left arm forward with your thumb facing up. Pull your belly in, press your right hand into the mat, and maintain a stable, balanced pose.
- Hold for 3 breaths, then release back to table-top position. Repeat on the opposite side.
Forearm Plank:
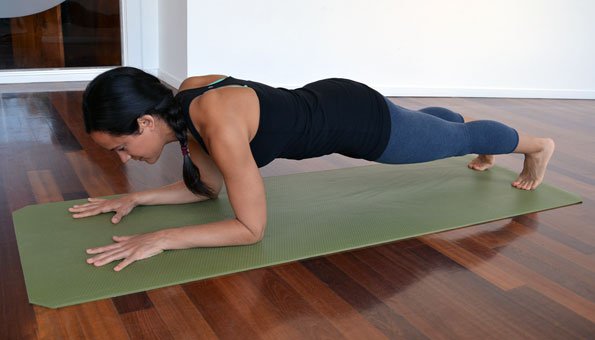
- Begin with your forearms flat on the mat and your elbows directly under your shoulders bent at a 90-degree angle. Place your palms down with your fingers spread.
- Walk your feet back until your body is straight. Use your abdominals for support and press down on the balls of your feet to engage your leg muscles. Hold for 5 breaths.
Don’t miss 3 Yoga Stretches to Unwind the Low Back.
Series 2: Open shoulder muscles and improve spine flexibility.
Wide-Legged Forward Bend (Prasarita Padottanasana) – Variation C:
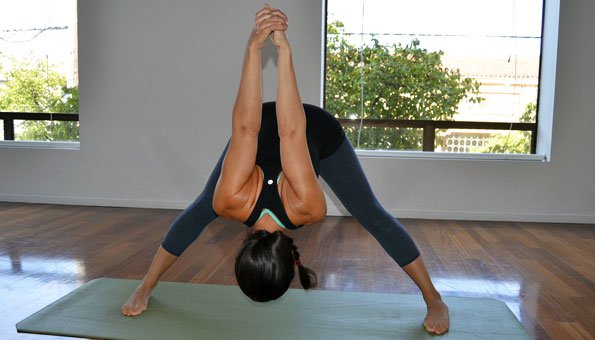
- Start with your feet 3 to 4 feet apart in a slightly pigeon-toed stance to protect your knees.
- Stand upright and extend your arms out to a T. Lower your arms and interlace your fingers behind your back.
- Slowly bend your torso forward. Inhale halfway down, then exhale as you lower your head toward the mat. Keep the outer edges of your feet on the mat and don’t lock your knees.
Supported Bridge (Setu Bandha Sarvangasana):
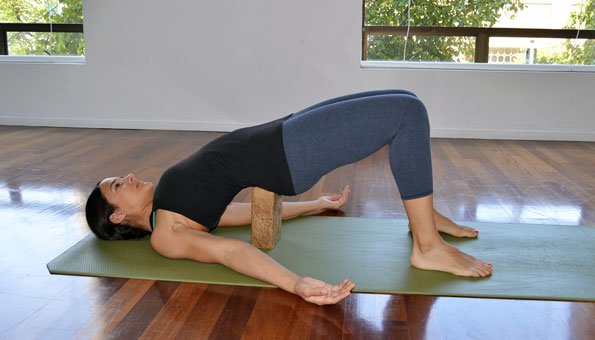
- Lay on your back with your arms extended and your palms facedown on the mat.
- Bend your knees and plant your feet on the mat hip distance apart. Your fingertips should be able to reach your heels.
- Press your palms into the mat and raise your hips up toward the ceiling while tightening your thighs. Imagine you are holding a block between your thighs.
- Place a block under your sacrum (lower back) and gently rest your weight on it. Flip your palms face-up and allow your shoulders to open as you relax. Breathe into the pose.
Camel Pose (Ustrasana):
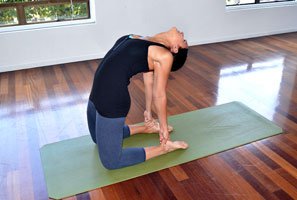
- Kneel on the mat with your knees hip-width apart. Place your hands on the small of your back with your fingers pointing down.
- Push your pelvis up, then gently arch your torso back, picturing a giant beach ball behind you. Keep your abdominal muscles engaged to protect the lower back. Only recline as far back as you’re comfortable.
- For a more advanced variation, reach down behind you and grab your heels. Stretch your chest forward.
Reclining Bound Angle Pose (Supta Baddha Konasana):
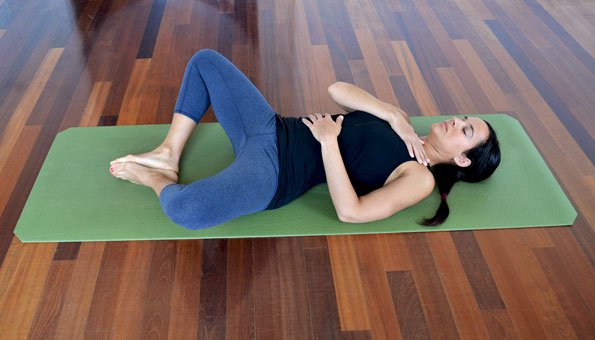
- Lay on your back and bend your knees. Allow your knees to fall open on the mat so your legs form a diamond.
- Bring your left hand to your belly and your right hand to your heart. You can also extend your arms on either side of you with your palms facing up.
- Close your eyes and take a few deep abdominal breaths.
Series 3: Increase spine flexibility and ease lower back tension.
Seated Forward Bend (Paschimottanasana):
- Begin in a seated position with your legs extended straight in front of you. Keep your ankles together and flex your feet so your toes point towards your face.
- Inhale and raise your arms overhead. Tighten your belly and, with a long spine, start to lower your chest to your thighs on the exhale. Maintain a tall spine and reach for your toes. If this stretch is too intense, you can bend your knees or hold a strap underneath your foot.
- Move in a wave-like motion by lengthening forward on the inhale and bowing deeper into the pose on the exhale.
- Stay here for a couple breaths, then carefully release the grip and bring your chest back up.
Seated Spinal Twist (Ardha Matsyendrasana):
- Start in a seated position with your legs extended straight in front of you. Bend your left knee, pull your foot in toward your body, and cross your right leg over the left. Place your right foot flat on the mat beside your left knee. Make sure both hips stay flat on the mat.
- Sit up tall and place your right palm (or fingertips) on the mat, directly behind the center of your back. Use this arm to brace yourself and lengthen the spine a bit more.
- Twist your torso to the right, placing your left elbow against your right knee.
- Pull your belly in and lengthen your spine on each inhale, then twist a bit deeper on each exhale.
- Release back to center, and counter the twist by placing both palms on the mat to the left of your left leg and bowing forward slightly.
- Come back to center and repeat on the other side.
The One Medical blog is published by One Medical, a national, modern primary care practice pairing 24/7 virtual care services with inviting and convenient in-person care at over 100 locations across the U.S. One Medical is on a mission to transform health care for all through a human-centered, technology-powered approach to caring for people at every stage of life.
Any general advice posted on our blog, website, or app is for informational purposes only and is not intended to replace or substitute for any medical or other advice. 1Life Healthcare, Inc. and the One Medical entities make no representations or warranties and expressly disclaim any and all liability concerning any treatment, action by, or effect on any person following the general information offered or provided within or through the blog, website, or app. If you have specific concerns or a situation arises in which you require medical advice, you should consult with an appropriately trained and qualified medical services provider.